This piece is the latest in a series of minimalist owls by Tuan Nguyen Tu, who for the past six months has been exploring simple, symbolic origami. This is an excellent example of how little technique is required to bring across a subject; many designers would have six or seven points, but he's shown us that we don't need any points at all, if we know how to make the paper work in our favor.
I admit this is sort of a theme for me, but I am reminded again not to think in terms of points, but in terms of lines-- visual artistry instead of pure structure.
I've been working on adding faces to boxpleated models, so the subject was already in my mind. Nonetheless, sculptures like this owl remind me how far I have yet to go still...
Saturday, February 28, 2009


Tuesday, October 21, 2008
Knowing when to make a point
I've sadly let this blog fall into disuse, but I've been doing some thinking that I find significant, but my Flickr page really isn't the right place to go on and on like I can here.
So here goes: there's something that's been bothering me about representational folding. Yes, we have technical complexity, and with it paperfolders have done some truly amazing things. Some prominent origamists have, however, noted that many creators tend to pursue complexity without regard to artistic expression, sometimes even forsaking aesthetic pleasure to add more detail. This has become a widely accepted opinion, but I think it neglects a more important issue: in the pursuit of more detail, are we forgetting the principles of good design as well?
I think there's a balance to design philosophy that is often ignored; yes, we must know when, how, and where to put in another point or two for detail... but we also need to keep in mind when NOT to put in another point. This spider is an example of what I'm talking about; there are all these ways to avoid putting in more points than are necessary, and these often lead to cleverer, more elegant models that we would otherwise end up with. I could have created a spider with eight legs and an abdomen, a total of nine points; but instead I created this one, which only uses one. It's much a much more efficient paper distribution, and can therefore be folded with a paper that will give it weight, without sacrificing the thinness of the legs.
At this point, with boxpleating and circle-packing techniques, it's really not that hard to create a complex model. What's still hard is to create a clever model, whether complex or not; and this provides a creative challenge that I think a lot of today's creators need.
We need to stop thinking in terms of numbers of points, and evaluate models based on their aesthetic and intellectual value.

So here goes: there's something that's been bothering me about representational folding. Yes, we have technical complexity, and with it paperfolders have done some truly amazing things. Some prominent origamists have, however, noted that many creators tend to pursue complexity without regard to artistic expression, sometimes even forsaking aesthetic pleasure to add more detail. This has become a widely accepted opinion, but I think it neglects a more important issue: in the pursuit of more detail, are we forgetting the principles of good design as well?
I think there's a balance to design philosophy that is often ignored; yes, we must know when, how, and where to put in another point or two for detail... but we also need to keep in mind when NOT to put in another point. This spider is an example of what I'm talking about; there are all these ways to avoid putting in more points than are necessary, and these often lead to cleverer, more elegant models that we would otherwise end up with. I could have created a spider with eight legs and an abdomen, a total of nine points; but instead I created this one, which only uses one. It's much a much more efficient paper distribution, and can therefore be folded with a paper that will give it weight, without sacrificing the thinness of the legs.
At this point, with boxpleating and circle-packing techniques, it's really not that hard to create a complex model. What's still hard is to create a clever model, whether complex or not; and this provides a creative challenge that I think a lot of today's creators need.
We need to stop thinking in terms of numbers of points, and evaluate models based on their aesthetic and intellectual value.
Sunday, February 10, 2008
Atlas and the Minotaur
These are actually based on the same packing, but the minotaur is a half sheet. The rest of the sheet went to make the world on Atlas' shoulders. To do this, I spread the pleats using some curved folds. Those pleats are then locked at the top end with a simple mountain fold on each one. They continue up through the shoulder to become the arms and head, which in turn become the fingers and legs.
Aside from the obvious technical challenge, I was trying to work on ways to put faces on these models. It's something I've been grappling with ever since my faceless Valkyrie, and I think these two worked for the corresponding level of complexity of the body. I'll keep working on that, though.
I'd like to give a tip of the hat to Oschene for providing the inspiration on how to make a sphere. I realize I should have done that when I folded the Klein Bottle, but I suppose it's better late than never.
About an hour after I made Atlas, I was sitting in my history class, listening to a lecture about capitalism. Somebody next to me (evidently as bored as I was) asked me what I had folded. After a second or two of reflection, I hypothesized that this, then, was the atlas that didn't shrug. I received nothing but a blank stare. No accounting for taste, I suppose...
www.flickr.com/photos/ahudson

Aside from the obvious technical challenge, I was trying to work on ways to put faces on these models. It's something I've been grappling with ever since my faceless Valkyrie, and I think these two worked for the corresponding level of complexity of the body. I'll keep working on that, though.
I'd like to give a tip of the hat to Oschene for providing the inspiration on how to make a sphere. I realize I should have done that when I folded the Klein Bottle, but I suppose it's better late than never.
About an hour after I made Atlas, I was sitting in my history class, listening to a lecture about capitalism. Somebody next to me (evidently as bored as I was) asked me what I had folded. After a second or two of reflection, I hypothesized that this, then, was the atlas that didn't shrug. I received nothing but a blank stare. No accounting for taste, I suppose...
www.flickr.com/photos/ahudson
Wednesday, January 9, 2008
Origami in China
As many of you know (especially the o-list folks) I took a two-week trip to China with family and freinds during the latter half of December. I promised that any origami I saw would be captured, tagged, and released back into the wild, as it were... so here they are.
I observed these folded objects in a pagoda and a restaurant, respectively. I was unable to procure instructions, as nobody was around in either case; the one on the left seems to be made from a long strip of cloth, crimped into a spiral then gathered at the back. I saw several things like it, so there may be some sort of diagram out threse somewhere.
The yellow object on the left (which has, surely, seen better days!) was part of a Buddhist shrine, so I didn't get the chance to examine it very closely... but here's a picture, anyway. It's from the Wild Goose Pagoda in the city of Xi'an, if any of you want to look it up... you have to climb the pagoda, though. It's on the third or fourth level if I remember right. I assume it's multi-piece, and in fact it looks like it may well be a variation on the modular lotus presented in David Mitchell's "Chinese Origami".
Sadly, aside from these two fabulous examples, I didn't see anything other than the ubiquitous napkin-folding, and only one of those was something I hadn't seen before... but I don't eat out much, so that doesn't mean anything. I reverse-engineered it in about three minutes, so I should be able to fold another one and take pictures if anybody's interested.
On a different note, I realized that this is my 100th photo post on flickr... But I'm a cheapskate and don't want to buy a Pro account, so I am tenatively announcing that I am in the process of designing/obtaining a website for my origami, and hope to have at least an image archive up by the end of the month, and maybe a full-fledged website by March or April (that would be new year's resolution number one).
So, Happy New Year everybody! And may it be a good one. Catch you all later.

I observed these folded objects in a pagoda and a restaurant, respectively. I was unable to procure instructions, as nobody was around in either case; the one on the left seems to be made from a long strip of cloth, crimped into a spiral then gathered at the back. I saw several things like it, so there may be some sort of diagram out threse somewhere.
The yellow object on the left (which has, surely, seen better days!) was part of a Buddhist shrine, so I didn't get the chance to examine it very closely... but here's a picture, anyway. It's from the Wild Goose Pagoda in the city of Xi'an, if any of you want to look it up... you have to climb the pagoda, though. It's on the third or fourth level if I remember right. I assume it's multi-piece, and in fact it looks like it may well be a variation on the modular lotus presented in David Mitchell's "Chinese Origami".
Sadly, aside from these two fabulous examples, I didn't see anything other than the ubiquitous napkin-folding, and only one of those was something I hadn't seen before... but I don't eat out much, so that doesn't mean anything. I reverse-engineered it in about three minutes, so I should be able to fold another one and take pictures if anybody's interested.
On a different note, I realized that this is my 100th photo post on flickr... But I'm a cheapskate and don't want to buy a Pro account, so I am tenatively announcing that I am in the process of designing/obtaining a website for my origami, and hope to have at least an image archive up by the end of the month, and maybe a full-fledged website by March or April (that would be new year's resolution number one).
So, Happy New Year everybody! And may it be a good one. Catch you all later.
Sunday, December 2, 2007
One-fold Swan

It bugs me when people don't think as highly of minimalism as a form of expression; admittedly I'm a little obsessed with the idea, but paperfolders in particular should know better. Origami is, essentially, an art of abstraction; we must choose which details to include, and which to leave out. Paper cannot render the world around us in perfect color and detail, and we should not necessarily expect it to. Not to be contrite, but sometimes less really is more. We should use subtle folds and careful sculpting to bring out the character of the subect, something many complex folders often forget about.
That is not to say that anybody that folds something minimal has automatically created an artistic statement; quite on the contrary, most simple models I've seen are misproportioned, awkward, and vague about what the intended subject is. If the statement is effective enough, though, it can be more powerful than a more complex one.
Think about it: in a drawing class, we are told to put less detail into the background than the subject, and to keep any distracting elements out of the composition, unless they have a purpose. This is because the subject carries any meaning or connotation the artist wishes to invoke. This is equally valid in sculptural art; we take out excessive detail to let the character of the piece come through. While detail is good when used effectively, it often distracts from the subject and obscures the elegance of the model.
Another thing that I have heard thrown around a lot is that a minimalist or easy piece is folded by a person who is lazy or not technically advanced enough to do any better. But I would disagree; instead these models require more from a designer and/or folder, because the subtle nuances of the character are that much harder to bring out when you're working with such a limited set of tools, which is in a sense just a projection off of the rules we already impose upon ourselves: no cuts, no glue, and (most of the time) folding from a square.
... Now go and fold something. Until next time,
--Andrew
Monday, October 8, 2007
Thoughts on Pleats
I've been thinking a lot about the various visual and technical effects that can be acheived using pleats. As in box-pleating (1) and corrugations (2), we can use them to collapse our paper into different forms, really whatever we want. We can use them in tessellations to store spare paper (3), which we then pull out at later points (4) to create twist-folds, geometric patterns, and all sorts of other things. We can also use it to change the proportions of flaps and models, in the forms of grafts and pleat-sinks.
But pleats have a number of visual effects that make them important as well. We can use pleats to create full, rounded three-dimensional forms and curves (5, 6). We can also use them to add detail that would take up too much paper with points, such as hair (7) and texture (8).
But there are still other uses of pleats, that I would like to see a little more of. I have made a few pleated models, really just simple corrugations that, to my surprise, ended up implying motion (9, 10) and even feeling (11), both subjects that deserve more attention in the origami community.
But all this makes me wonder, what else can pleats do that we haven't thought of yet, or that we haven't explored?
But pleats have a number of visual effects that make them important as well. We can use pleats to create full, rounded three-dimensional forms and curves (5, 6). We can also use them to add detail that would take up too much paper with points, such as hair (7) and texture (8).
But there are still other uses of pleats, that I would like to see a little more of. I have made a few pleated models, really just simple corrugations that, to my surprise, ended up implying motion (9, 10) and even feeling (11), both subjects that deserve more attention in the origami community.
But all this makes me wonder, what else can pleats do that we haven't thought of yet, or that we haven't explored?
Wednesday, October 3, 2007
Flower Tower Variations

Watch, I'll come up with a good name for this two days after I post it...
Originally uploaded by origami_madness
Anyway, I have recently made twenty-some variations on Chris Palmer's Flower Tower. This is one of them, and you can see the rest on my photostream if you like (http://www.flickr.com/photos/ahudson/).
I started doing these right after I found out about the decreeping technique from a description of the process that Tom Hull had written (www.spundreams.net/~andy/origami/flower-tower-howto.txt). Working from there, I modified the model by pursing the center in different ways, and then generalized the structure to a non-logarithmic form, which you see here in this picture. I also used some elias stretches and shaping folds to finish it off.
Anyway, I'm starting work on a big post about logarithmic tessellations (like this one), and I should post it in the next month or so.
Tuesday, January 9, 2007
How to Solve Crease Patterns
Sorry for the Hiatus everybody, I was off on vacation in
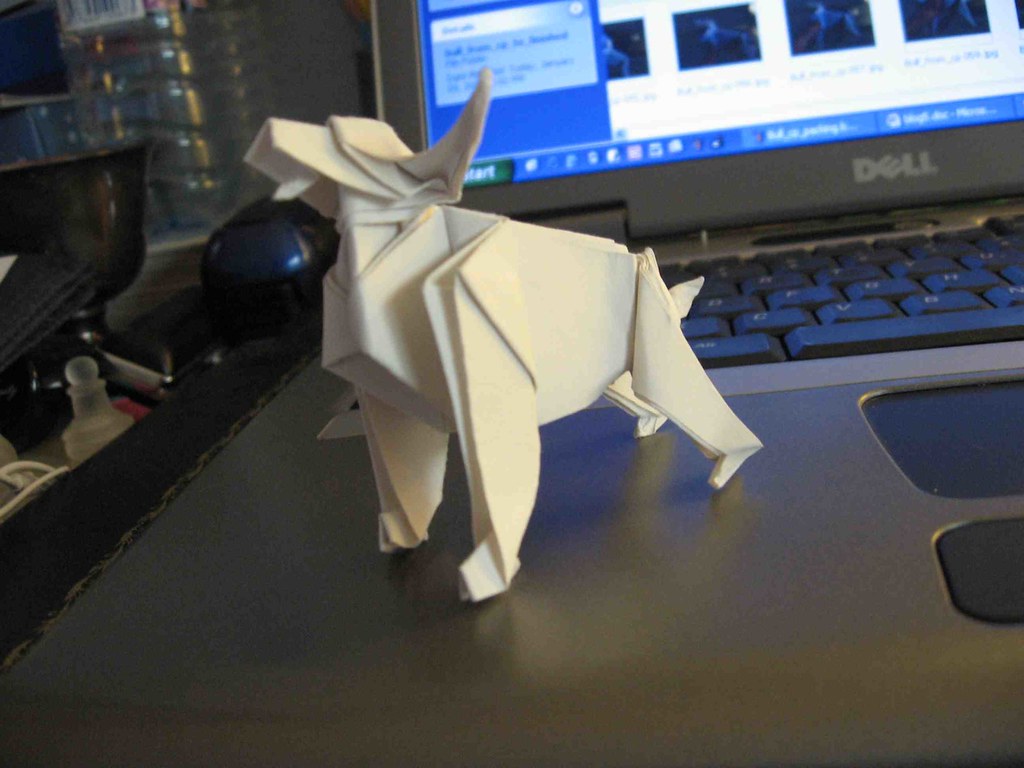
Today I tried something I’ve never really done before-- designing a model by crease pattern, using module theory. For those of you that aren’t familiar with this method, I took a tree figure for my chosen subject (in this case a bull) and made a crease pattern for it using the same triangular modules that make up most of the classic bases (the bird, frog, and fish bases). I came up with this crease pattern:
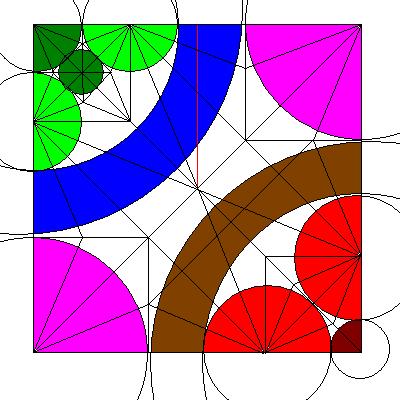
The red line on both crease patterns is for reference. On the colored version, the red are the back legs, the dark red is the tail, the brown is the torso, the purple is the front legs, the blue is the neck, the light green is the horns, and the dark green is the eyes and snout. I’m sorry about my limited paint skills, the neck and torso rivers aren’t quite shaped like that; but I don’t have the time or patience to figure out how to do it right. They aren’t too far off anyway.
But anyway, once I had this figure composed, I realized it was not very easy to fold from crease pattern, and thus the teeming masses that I hope are reading this may have trouble doing so and get stuck (but not give up, right? eh?). So I decided to blog on how to collapse crease patterns, using this as an example. For a more detailed set of directions accompanied with pictures, look in the corresponding photo set on my Flickr page. I didn't add them here because I have dial-up, and that would take too much time. First, make as many of the bigger folds as you can. Here, you fold the diagonals first, then use the reference mark (made by folding the square in half here) and bisect the area between it and the diagonals; then make the next set of folds, matching the ends of those bisectors.
One thing you want to keep an eye out for is patterns you’ve seen before; for example, on the two corners on either side of the middle section, there is the crease pattern for a half bird base; so you can pleat the center part over to the side and fold the bird base all at once.
The head and tail sections can be creased by means of a number of mountain and valley folds; then comes the tricky part of collapsing the base. Here, start with the half-bird bases on the sides; then fold the torso flap up and collapse the lines for the middle of the base. For the head, you’ll have to make the bird base on the inside in between some layers; this is no easy feat, as you must hold the layers around it flat while folding it. However, once you finish that, the base is complete.
Next comes what I think is the hardest part: shaping and finishing. This often requires a lot of vague folds that have to be estimated; but the crux of the situation is, you must make the model look like the subject using various methods from the proverbial designer’s bag of tricks. I posted a full sequence of pictures on my Flickr page; look inside the set labeled “Crease Pattern Solution: Bull” and you should find enough pictures to help you finish it off. Essentially, what I did was reverse-fold the head section upward, position the horn and eye flaps, make a nose and eyes, and curve the horns; then I positioned the legs and folded some rather mediocre-looking hooves on the leg flaps (I’ll figure out some good ones eventually, but now’s not the time), and rabbit-eared to make the tail.
A few optional things that can be done are to lock the inside layers together, to hide the folds around the tail, use wet-folding to put some nice shaping folds on the back, head, and legs, etc. Also, the nose can be turned into a lower jaw instead, a la many of Montroll’s animals.
So there you go. If you’ve been following along, and have gotten stuck or don’t like the way it turned out, remember: folding from a crease pattern is one of the hardest things to do in origami, and it takes practice. If you’ve gotten really stuck, email me or leave a comment and I’ll try to help you.
Have fun, and get to work on some more crease patterns!
Sunday, November 19, 2006
An Excercise in Modulation
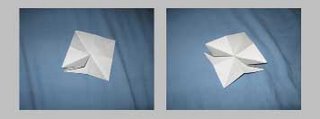
John Montroll’s Starfish, from Animal Origami for the Enthusiast, has always been a favorite of mine; both because of the base that it employs (a five-sided preliminary fold) and because of the nice curving effect presented as a result of the folding process. I was playing with it a few days ago and noticed an interesting property: the crease pattern can be reduced to five side-triangles, as opposed to the customary four for a waterbomb base or preliminary fold. Upon reflection, I realize that this was quite obvious, but nonetheless, I was determined to do something with this model, to help me understand its structure and the process used to design it if not out of sheer curiosity. I shaded the finished base with a pencil, and then opened it out to see where these component triangles lay. Surprisingly enough, it was a logical arrangement on the outside of a pentagon, superimposed onto the framework of a square.
This whole experience, of course, provided an interesting mathematical puzzle: If this could be done from four to five points, then why not from five to six?
I played with it on paper for awhile, and this is what I came up with:

This whole experience, of course, provided an interesting mathematical puzzle: If this could be done from four to five points, then why not from five to six?
I played with it on paper for awhile, and this is what I came up with:

In case you haven’t guessed, the gray bits are unused paper on the edges, the green the collapsed paper in the center, and the blue is the actual triangles that make up the model itself.
I wouldn’t be surprised if somebody’s already done this before, but it’s a neat little exercise in modulation nonetheless. I also tried this for eight points, but it didn’t work out as cleanly; there was too much extra paper sitting in the middle of the model to look very good. The crease pattern, for those who are wondering, was essentially built off of a blintz fold.
Also, many thanks to Eileen Tan for putting me onto her RSS aggregator! If you don’t know about it already, I suggest checking it out; it saves you the time of having to check six or seven different blogs each day, and it follows lots of excellent blogs that I hope mine will someday equal. It’s at http://spinflipper.com/origami/feed.php.
I wouldn’t be surprised if somebody’s already done this before, but it’s a neat little exercise in modulation nonetheless. I also tried this for eight points, but it didn’t work out as cleanly; there was too much extra paper sitting in the middle of the model to look very good. The crease pattern, for those who are wondering, was essentially built off of a blintz fold.
Also, many thanks to Eileen Tan for putting me onto her RSS aggregator! If you don’t know about it already, I suggest checking it out; it saves you the time of having to check six or seven different blogs each day, and it follows lots of excellent blogs that I hope mine will someday equal. It’s at http://spinflipper.com/origami/feed.php.
Sunday, November 12, 2006
Welcome, Fellow Paperfolders!
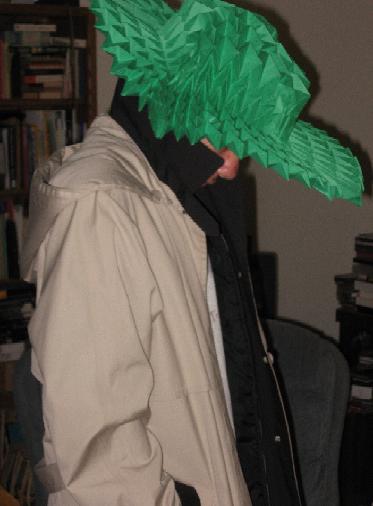
Hey there, teeming blogoshpere! It's yet another origami design/presentation blog! I've been folding casually for as long as I can remember, and more seriously for the past year or so. I've gotten to the point that I think a blog might be useful, as a personal journal if nothing else. Some of you may have seen me as a hudson on the origami forum, (http://www.thekhans.me.uk/forum), or as origami_madness on Flickr, although I've been considerably less than prolific on either one.
But anyway: as I said, this is an origami design/presentation blog, so I'm going to introduce one of the models that i've done recently. On the left is me wearing Jeremy Shafer's "Flasher Hat", from his book Origami to Astonish and Amuse (published by St. Martin's Press). I folded it out of 28 inch peice of green butcher paper, and it took about 8 hours; butcher paper probably wasn't the best choice... it's too hard to work with, for models that require a massive all-in-one collapse like this one.
Subscribe to:
Posts (Atom)